28 November 2017

Microsoft Ignite Guide for First Time Attendees

I have been coming to the Microsoft Ignite convention since it's inception in 2015. The first conference held in Chicago had a lot of fallacies. It was the first time Microsoft had combined the conferences into one. Since then, Microsoft has steadily improved. Atlanta was significantly better and this year's conference in Orlando was awesome! I am sharing my experiences on the conference and what I suggest might be good for first-timers. It is overwhelming the first time you attend. It was for me the first year and I have had first-timers tell me the same thing.

Registration

Registration is pretty straightforward. It requires paying up front when you register. This is the website for Ignite registration. If you are a Microsoft MVP, registration will be cheaper and you can register earlier.

MVPs & Ignite

If you are an MVP, Registration will be cheaper. You will also have the chance to submit a proposal for speaking at Ignite. There will be a pre-day conference for MVPs while also getting the MVP sticker for your badge.

Boarding

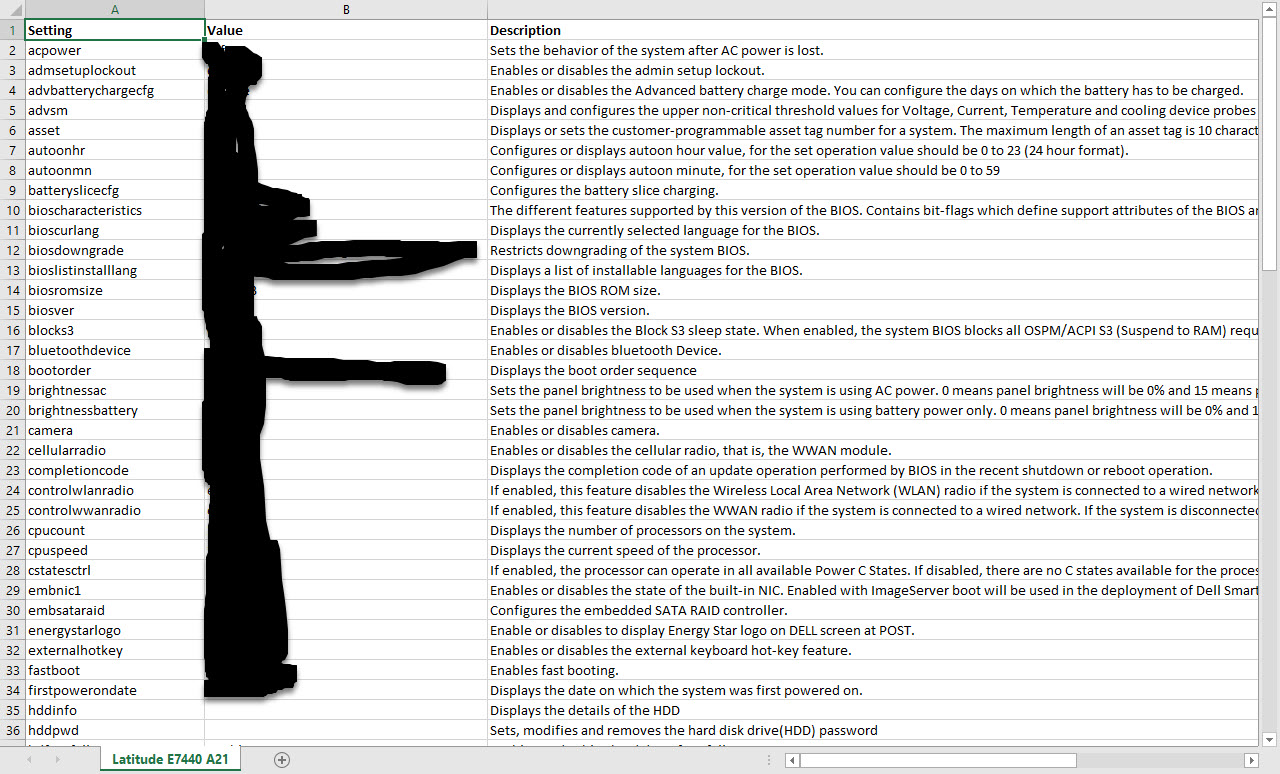
When Microsoft opens up the registration for Ignite, they will have a set number of hotels reserved for the conference. There are pros and cons to this. The first year in Chicago, the set of hotels they had reserved were all very expensive. Personally, I appreciate the firm I work at paying my way each year to the conference, so I try to be very conservative on my charges. I ended up using AirBNB that year and it was a great experience as I was close to the McCormick Place and the entire week cost less than one night did at the select hotels. Atlanta, the hotels were nicely priced, so I stayed in one of the select hotels. Finally, Orlando, I ended up staying in a hotel that was close to a select hotel. I did not like the billing policies of the hotels in Orlando, which I will talk about later.

If you stay in select hotels, a shuttle, which is a full-size motorcoach, comes by to pick you up in the mornings and take you back in the evenings. It does not run midday.

As for booking your hotel, if you decide to use a select hotel and register during your Ignite registration, here are some facts about it:

  1. You are only reserving it. You will have to pay for the room when you arrive. Some of the hotels will allow you to pre-pay, but as with my experience in Orlando, I did not like how they handle pre-payment. Several of the hotels I called send an authorization form to you and have you fill out the credit card information to fax back. When I questioned what happens to that form, they permanently file it. Yeah, I don't want my credit card information permanently filed. They don't take credit card information over the phone either. That is why I ended up using Priceline to book my hotel near one of the select hotels so I could walk over and take the shuttle.
  2. While reserving on the Ignite registration site, if your card expires before the conference, it will not let you register for a hotel since it is only reserving the room. It requires the card be valid past the date of your stay. 
  3. Some of the select hotels do have activities going on in the evenings.

Food and Drink

Breakfast and lunch are provided at Ignite. Since the first year there, the food has greatly improved. I still hear complaints about it but with the vast size of the conference, you can't expect to feed 23,000+ with restaurant style accommodations. This is the typical lunch tray. They do accommodate for food allergies and specific diets such as vegan. Supper is not served, but there will be food stands set up a few times during the conference late in the afternoon that I thought was more than ample for supper. There are refrigerators setup throughout the conference that has lots of canned and bottled drinks free of charge. There are also tables with snacks such as cracker packs. 


Sessions

The main reason you are coming to Ignite is for the sessions. They provide you with continuing education on new ideas and new products, while also providing training on existing products. The sessions vary widely. They consist from beginner to advanced. The best thing is to log in to the Ignite registration website and go through the list of sessions to see what you want to attend. As you select them on the website, they will also be able to sync with the Ignite mobile app. The mobile app can add the sessions you choose to your calendar for alerts. You are likely thinking, what can possibly be the downside to the sessions. Size of the conference is number one. The conference area is so big that you may not have time to get from one session to another. Some sessions are closed after the session has begun. There is often more than one occurrence for a specific session allowing you to get to that session in the event the first one coincides at the same time. One thing Microsoft did for the sessions that has helped a lot is live streaming that helps with not having to physically go to a session and be able to sit there and watch it on your smart device. 

Microsoft also had hands-on labs that are great for getting hands-on experience with apps that you may want to check out or need more time with. 

Attire

People vary vastly in their attire. It goes from business casual to casual.

Vendor Stands

The vendor stands open up on Monday at 12:00 pm after the Keynote. There are lots of vendors there. There are giveaways from motorcycles to shirts. It is a great place to approach vendors for specific questions on their products. If you are having problems with a product at your company and have questions, most of the vendors have a technical person there to answer them for you. At the least, they can put you in touch with the right person at their company which can answer your question(s). Part of the vendor stands is Microsoft. This means you can go to them for questions about Microsoft products. 

After-Hour Vendor Parties

Some of the vendors hold after-hour parties, and from my experience, some are extraordinary. They go all out. The parties are not held at the conference center. They are held at different locations. For instance, one party I attended was in an airplane hanger. Another was at the John Hancock Signature Bar. The problem a lot have is knowing about the parties.

There are a few ways to learn about them. The first is to go to the vendor tables and some will have party sign-up sheets. Some will post on Twitter with the hashtag #MS_Ignite. Another is to follow Harjit Dhaliwal on Twitter. He posts a lot of the parties taking place. The times and length of the parties vary. If the party is held at a facility that is outside of walking distance, the vendors often supply transportation to and from the party.

Celebration

The celebration is a lot of fun. The first year of Ignite, the celebration was a total disaster. There were 30 food tables for 20,000+ attendees. Yeah, it took up to an hour for a small serving of food.  Since then, Microsoft has done very well. The last two celebrations have been great. The celebration in Atlanta was held at the Centennial Olympic Park. It was a lot of fun. The celebration in Orlando was held at Universal Studios and it was fantastic! They cordoned off part of the park for the celebration. 

For the celebration, you can bring a significant other with you. The cost is $150 and is booked when you book for Ignite. One thing I learned this last year was that there are only 1,500 openings for a significant other. Apparently, others did not know this either as I saw one attendee walking around the conference with a piece of paper on his back asking to purchase an armband for his spouse. My suggestion to you is to book fairly early if you want to bring someone with you to the celebration. 

Navigating the Conference

It takes time to get accustomed to the enormous area of the conference. There are Microsoft employees standing around to help you find where you are going. There will be a LOT of walking. Bring comfortable shoes. It is a must! Last two years, I logged 29 miles in Atlanta and 34 miles in Orlando. The Ignite app will help you greatly in getting around the conference. 

Connections

Microsoft Ignite is just as much social as it is educational. You are likely to get a lot of connections with other IT professionals. If you have business cards, bring your box with you. I learned this last year that taking a picture of someone's badge with the iPhone 7 Plus also reads their QR code. That was pretty cool to learn by accident. 


Finally, 1E interviewed me at Ignite and here is the video on how to get around. 


23 October 2017

Infineon TPM Vulnerability Report using SCCM (CVE-2017-15361)

This weekend, I listened to Security Now's KRACKing WiFi podcast Episode 633 where they discussed the TPM vulnerability. Finding out exactly what to look for was tedious. I finally ran across Lode Vanstechelman's blog entry that told exactly what to look for. The only thing it does not address is using SCCM to find vulnerable systems. Since you are looking for specific TPM manufacturer IDs and Versions, SCCM is a great tool to find the systems across a large network.

As listed on Lode's site, you are looking for Manufacturer ID 1229346816. If that ID is present, then the following versions are affected:

  • 4.00 to 4.33
  • 4.40 to 4.42
  • 5.00 to 5.61
  • 6.00 to 6.42
  • 7.00 to 7.61
  • 133.00 to 133.32
NOTE: The firm I work at did not have any systems that met the manufacturer ID criteria. The WQL below is written without the ability to test it. Treat it as a template. I would appreciate if you could leave feedback on whether it needs to be modified or not.

Here is the WQL query:

 select SMS_R_System.Name, SMS_G_System_TPM.ManufacturerId, SMS_G_System_TPM.ManufacturerVersion from SMS_R_System inner join SMS_G_System_TPM on SMS_G_System_TPM.ResourceID = SMS_R_System.ResourceId where SMS_G_System_TPM.ManufacturerId = 1096043852 and ((SMS_G_System_TPM.ManufacturerVersion >= "4" and SMS_G_System_TPM.ManufacturerVersion <= "4.33") or (SMS_G_System_TPM.ManufacturerVersion >= "4.40" and SMS_G_System_TPM.ManufacturerVersion <= "4.42") or (SMS_G_System_TPM.ManufacturerVersion >= "5" and SMS_G_System_TPM.ManufacturerVersion <= "5.61") or (SMS_G_System_TPM.ManufacturerVersion >= "6" and SMS_G_System_TPM.ManufacturerVersion <= "6.42") or (SMS_G_System_TPM.ManufacturerVersion >= "7" and SMS_G_System_TPM.ManufacturerVersion <= "7.61") or (SMS_G_System_TPM.ManufacturerVersion >= "133" and SMS_G_System_TPM.ManufacturerVersion <= "133.32")) order by SMS_G_System_TPM.ManufacturerId  

17 October 2017

SCCM and MDT Master Kill Switch

With the advent of mass deployment errors such Emory University and CommBank, there needs to be a master kill switch. I also read several months ago about a University in one of the Scandinavian countries that did the same thing. The last two years at Microsoft Ignite, I have also talked to SCCM professionals who experienced the same thing, one in Oklahoma at an oil company and another in Michigan at a financial services company. The last company with more than 100,000 systems abandoned SCCM for imaging purposes and went to MDT to assure this would never happen again.

Over the past three years, I have contemplated a new method for resolving this. At first, I started writing a tool that would shut down all pertinent services on machines such as windows installer and would kill certain task sequences, along with several other things. While having partially written this, a much easier solution came to my mind. This solution is very basic but is also most effective. 

I also want to point out one thing here. My solution does not compete with Adaptiva's. Adaptiva has a much more robust solution, but if you choose to not use their solution, this solution can do a good job at stopping an image or even an application from installing. 

The solution I have come up with uses a simple text file. In the task sequence list, you will want this to be before the system partitions are wiped. I took a screenshot of this in MDT, which you obviously would not need this fuse unless you have a team that images machines and you want the process to stop right now. In SCCM, you would make sure it is before the system reboots into WinPE to wipe the partitions.


As you can see from the pic, I used a command line task sequence. I used a PowerShell one-liner to test if the file is present. If it is not present, then it returns an error code 1. This error code kills the build.

powershell.exe -command "&{if ((Test-path <Directory>\BUILDFUSE\BUILDFUSE) -eq $false) {Exit 1}}"

The file I created is an empty text file which I removed the .TXT extension.


When I started my image, the picture below shows what happened when the file was not present.


This could also be incorporated into a software deployment in the event you accidentally deploy an application and realize it needs to stop NOW! If you deploy apps like I do using script files (PowerShell), you could add a line in the script to check for the file before proceeding. This would kill the installation if it has started, but not reached the point of installation yet.

It is obvious that if the admin does not realize there was a mistake made, the image will continue.

05 October 2017

Conditional Task Sequence Reboot in SCCM and MDT

Recently, I built and published the Dell driver update script that may or may not require a reboot. I instituted the script as a task sequence in MDT and then made the following task sequence a reboot. Thinking about it, the reboot may not be required and therefore that would be a waste of time. To get around this, I decided to investigate a conditional reboot.

In order to institute this, I used the standard Restart Computer task sequence and I added conditional parameters to the Options tab shown below.


Here is a screenshot of each of the three keys:


I have tested this by injecting the specified registry keys and these work great. One thing you will encounter when creating these to test just for the existence of the key without a value is a requirement for a value as shown below. I entered a blank space in that field and it worked.


There is one additional attribute to look at and that is a pending reboot via the configuration manager client. It is the following:

(([wmiclass]"\\.\root\ccm\ClientSDK:CCM_ClientUtilities").DetermineIfRebootPending()).RebootPending

So far, I have not been able to get this incorporated as a condition using a WQL query. Apparently, you can only use WQL for the class root\cimv2 and no others. I am likely going to have to create an additional task sequence that creates an MDT/SCCM variable with a boolean value using PowerShell. That is on my list.

04 October 2017

Trusted Sites Report

Recently, we had to add a new trusted site to the trusted sites GPO. As you may know, if the GPO contains a lot of trusted sites, it can be cumbersome to determine if a site is in there. I wrote this PowerShell script that will generate a report listing all trusted sites. This script will grab both user and local machine based trusted sites. It separates those in the report. The report is displayed on the screen with the option to write it to a text file by specifying the FileOutput parameter switch.

You can download the script from my GitHub site located here.


 <#  
      .SYNOPSIS  
           Trusted Sites Report  
        
      .DESCRIPTION  
           This script will retrieve a list of trusted sites pushed out via GPO and write the list to a text file in the same directory as the script.  
        
      .PARAMETER FileOutput  
           Specifies to write output to a file  
        
      .PARAMETER FileName  
           Name of the file to write the output to  
        
      .NOTES  
           ===========================================================================  
           Created with:    SAPIEN Technologies, Inc., PowerShell Studio 2017 v5.4.143  
           Created on:      10/3/2017 2:23 PM  
           Created by:      Mick Pletcher  
           Filename:        TrustedSitesReport.ps1  
           ===========================================================================  
 #>  
 [CmdletBinding()]  
 param  
 (  
      [switch]$FileOutput,  
      [ValidateNotNullOrEmpty()][string]$FileName = 'TrustedSitesReport.txt'  
 )  
   
 function Get-RelativePath {  
 <#  
      .SYNOPSIS  
           Get the relative path  
        
      .DESCRIPTION  
           Returns the location of the currently running PowerShell script  
        
      .NOTES  
           Additional information about the function.  
 #>  
        
      [CmdletBinding()][OutputType([string])]  
      param ()  
        
      $Path = (split-path $SCRIPT:MyInvocation.MyCommand.Path -parent) + "\"  
      Return $Path  
 }  
   
 #User based trusted sites  
 $HKCU = $(get-item "HKCU:\SOFTWARE\Policies\Microsoft\Windows\CurrentVersion\Internet Settings\ZoneMapKey" -ErrorAction SilentlyContinue).property | Sort-Object  
 #Local machines based trusted sites  
 $HKLM = $(get-item "HKLM:\SOFTWARE\Policies\Microsoft\Windows\CurrentVersion\Internet Settings\ZoneMapKey" -ErrorAction SilentlyContinue).property | Sort-Object  
 #Get the location where this script is being executed from  
 $RelativePath = Get-RelativePath  
 #Define the path to the output file  
 $File = $RelativePath + "TrustedSitesReport.txt"  
 #Delete the output file if it exists  
 If ((Test-Path $File) -eq $true) {  
      Remove-Item -Path $File -Force  
 }  
 #Create output file  
 New-Item -Path $File -ItemType File -Force  
 #Add HKCU trusted sites to the output file if they exist  
 If ($HKCU -ne $null) {  
      #Create Screen Header  
      "HKEY_CURRENT_USERS" | Out-File -FilePath $File -Append  
      #Display to the screen  
      $HKCU  
      If ($FileOutput.IsPresent) {  
           $HKCU | Out-File -FilePath $File -Append  
      }  
      #Input seperator"   
      " "| Out-File -FilePath $File -Append  
 }  
 #Add HKLM trusted sites to the output file if they exist  
 If ($HKLM -ne $null) {  
      #Create Screen Header  
      "HKEY_LOCAL_MACHINE" | Out-File -FilePath $File -Append  
      #Display to the screen  
      $HKLM  
      If ($FileOutput.IsPresent) {  
           $HKLM | Out-File -FilePath $File -Append  
      }  
 }  
   

18 September 2017

Retrieving all Files off of the SpaceMonkey, Now the Vivint Smart Drive

I purchased the SpaceMonkey back when it first came out. It has been a so-so NAS device that also backed up to the cloud. Vivint bought them out and I ran into real problems when the HDD had failed on the device and the cloud backup was lost during the transition to Vivint. Luckily, I overnighted it to them and they were able to retrieve all contents and back it up to the Vivint drive.

Recently, Vivint changed how the drive works and abandoned the tool that you install. They decided to go all web based on retrieving your files. I contacted them and they verified the tool is no longer available to download. This is not good because I have a LOT of files on the SpaceMonkey that are enormous. As you might know, browser downloading is not dependable for very large files. I have some files that are tens of gigabytes in size. Supposedly the drive detects if your browser and the smart drive are on the same network. If so, it is supposed to work flawlessly and download directly from the device to your machine. Browser downloading typically fails after a few gigabytes, so no, it has not been flawless. In fact, downloading several gigs worth of pictures from different trips was a hit or miss thing. Some would not download correctly and were corrupted. Luckily, my wife's old computer was resurrected and it had the Spacemonkey tool installed. The tool still works with the Vivint drive. It maps the drive to your machine to allow for robocopy to be used. Since they have removed it from their site, you can download it from my GitHub site located here.


15 September 2017

SCCM Hardware Inventory with Verification

This script will initiate a hardware inventory. It scans the InventoryAgent.log file for the initiation of the hardware inventory and then for the completion. The script will return an error code 1 if the initiation was ignored or it exceeded five minutes. The purpose of this is to verify a hardware inventory was actually initiated. I have had instances where I would execute a hardware inventory multiple times not knowing if it actually occurred. This script verifies that.

You can download the script from my GitHub site located here.


 <#  
      .SYNOPSIS  
           Initiate SCCM Hardware Inventory  
        
      .DESCRIPTION  
           This script will initiate an SCCM hardware inventory and return a 1 if it fails to initiate or a 0 if it is a success. The script works by scanning the InventoryAgent. log file for the status of the hardware inventory.  
        
      .EXAMPLE  
           powershell.exe -executionpolicy bypass -file SCCMActions.ps1  
        
      .NOTES  
           ===========================================================================  
           Created with:     SAPIEN Technologies, Inc., PowerShell Studio 2016 v5.2.122  
           Created on:       5/20/2016 2:28 PM  
           Created by:       Mick Pletcher  
           Filename:         SCCMActions.ps1  
           ===========================================================================  
 #>  
 [CmdletBinding()]  
 param ()  
   
 function Get-CurrentDate {  
 <#  
      .SYNOPSIS  
           Get the current date and return formatted value  
        
      .DESCRIPTION  
           Return the current date in the following format: mm-dd-yyyy  
        
      .NOTES  
           Additional information about the function.  
 #>  
        
      [CmdletBinding()][OutputType([string])]  
      param ()  
        
      $CurrentDate = Get-Date  
      $CurrentDate = $CurrentDate.ToShortDateString()  
      $CurrentDate = $CurrentDate -replace "/", "-"  
      If ($CurrentDate[2] -ne "-") {  
           $CurrentDate = $CurrentDate.Insert(0, "0")  
      }  
      If ($CurrentDate[5] -ne "-") {  
           $CurrentDate = $CurrentDate.Insert(3, "0")  
      }  
      Return $CurrentDate  
 }  
   
 function Invoke-HardwareInventoryCycle {  
 <#  
      .SYNOPSIS  
           Hardware Inventory Cycle  
        
      .DESCRIPTION  
           This function will invoke a hardware inventory cycle and it waits until the cycle is completed.  
        
      .EXAMPLE  
                     PS C:\> Invoke-HardwareInventoryCycle  
        
      .NOTES  
           Additional information about the function.  
 #>  
        
      [CmdletBinding()]  
      param ()  
        
      $Completed = $false  
      $StartTime = Get-Date -UFormat %R  
      $CurrentDate = Get-CurrentDate  
      Write-Host "Running Hardware Inventory Cycle....." -NoNewline  
      Start-ConfigurationManagerClientScan -ScheduleID "00000000-0000-0000-0000-000000000001"  
      Do {  
           Start-Sleep -Seconds 1  
           $CurrentTime = Get-Date -UFormat %R  
           $TimeDifference = New-TimeSpan -Start $StartTime -End $CurrentTime  
           $Log = Get-Content $env:windir"\ccm\logs\InventoryAgent.log"  
           $Count = $Log.count  
           $Count = $Count - 1  
           $Log = $Log[$Count]  
           $LogTable = $Log.split("<")[-1]  
           $LogTable = $LogTable.Substring(0, $LogTable.length - 1) -replace ' ', ';'  
           $LogTable = "@{$($LogTable)}" | Invoke-Expression  
           $LogTime = $LogTable.time.Substring(0, 5)  
           [datetime]$StringTime = $LogTable.time  
           If (($Log -like "*End of message processing*") -and ($CurrentDate -eq $LogTable.date) -and ($LogTime -ge $StartTime)) {  
                Write-Host "Completed" -ForegroundColor Yellow  
                $Success = $true  
                $Completed = $true  
           }  
           If (($Log -like "*already in queue. Message ignored.*") -and ($CurrentDate -eq $LogTable.date) -and ($LogTime -ge $StartTime)) {  
                Write-Host "Ignored" -ForegroundColor Red  
                $Success = $false  
                $Completed = $true  
           }  
           If ($TimeDifference.Minutes -ge 5) {  
                Write-Host "Failed" -ForegroundColor Yellow  
                $Success = $false  
                $Completed = $true  
           }  
      } while ($Completed -eq $false)  
      Return $Success  
 }  
   
 function Start-ConfigurationManagerClientScan {  
 <#  
      .SYNOPSIS  
           Initiate Configuration Manager Client Scan  
        
      .DESCRIPTION  
           This will initiate an SCCM action  
             
      .PARAMETER ScheduleID  
           GUID ID of the SCCM action  
      #>  
        
      [CmdletBinding()]  
      param  
      (  
           [ValidateSet('00000000-0000-0000-0000-000000000121', '00000000-0000-0000-0000-000000000003', '00000000-0000-0000-0000-000000000010', '00000000-0000-0000-0000-000000000001', '00000000-0000-0000-0000-000000000021', '00000000-0000-0000-0000-000000000022', '00000000-0000-0000-0000-000000000002', '00000000-0000-0000-0000-000000000031', '00000000-0000-0000-0000-000000000108', '00000000-0000-0000-0000-000000000113', '00000000-0000-0000-0000-000000000111', '00000000-0000-0000-0000-000000000026', '00000000-0000-0000-0000-000000000027', '00000000-0000-0000-0000-000000000032')]$ScheduleID  
      )  
        
      $WMIPath = "\\" + $env:COMPUTERNAME + "\root\ccm:SMS_Client"  
      $SMSwmi = [wmiclass]$WMIPath  
      $Action = [char]123 + $ScheduleID + [char]125  
      [Void]$SMSwmi.TriggerSchedule($Action)  
 }  
   
 Clear-Host  
 $Success = Invoke-HardwareInventoryCycle  
 If ($Success -eq $false) {  
      Exit 1  
 }  

03 August 2017

Remove AD Disabled Systems from SCCM

Recently, I wanted to clean up SCCM of a bunch of systems that still reside in active directory, but are also disabled. The first thing I did was to try and query SCCM for a list of systems that were populated via AD, but have a userAccountControl attribute of 4098. The attribute is normally 4096, but it changes to 4098 when the account is disabled. I learned the userAccountControl is populated in SCCM via AD, but there is a catch. It is only populated while the account is active. If the account is deactivated, SCCM cannot read the 4098 value, therefore it will still read inside SCCM as 4096.

The next thing was to use PowerShell as the connector between AD and SCCM to clean these items out of SCCM. The script below queries the designated $SCCMCollection, preferably 'All Systems', for a list of all systems in the All Systems collection. That collection is populated by Active Directory. Once it gets a list of all systems within that collection, it will then check if the -ReportOnly parameter is selected and will only display a report of the systems with the system name and if it is enabled or not.

If -ReportOnly is not defined, then the script will go through the list and remove machines from SCCM that are disabled in AD.

After I ran this script, I ran the Active Directory System Discovery against AD. The deleted systems did not return in SCCM.

To run this script, you will need RSAT installed. I have included the SCCM module locator in the script that will locate the .psd1 module to use with the script. All you need to do is to define the $SCCMServer with the SCCM server name, $SCCMDrive with the SCCM drive name, and the name of the desired collection in $SCCMCollection; I used All Systems. I ended up using Orchestrator to execute the script once a week. You could also use a scheduled task. Also, you will need RSAT installed on the system this script is executed on.

You can download this script from my GitHub site located here.


 <#  
      .SYNOPSIS  
           SCCM AD Cleanup  
        
      .DESCRIPTION  
           This script removes systems from SCCM that are populated via active directory, but have been disabled in AD.  
        
      .PARAMETER SCCMServer  
           Name of the SCCM server  
        
      .PARAMETER SCCMDrive  
           SCCM Drive  
        
      .PARAMETER SCCMCollection  
           SCCM collection to query for cleanup  
        
      .PARAMETER ReportOnly  
           Produce a report only  
        
      .NOTES  
           ===========================================================================  
           Created with:     SAPIEN Technologies, Inc., PowerShell Studio 2017 v5.4.143  
           Created on:       8/3/2017 9:07 AM  
           Created by:       Mick Pletcher  
           Filename:         SCCMADCleanup.ps1  
   
           .EXAMPLE  
                powershell.exe -file SCCMADCleanup.ps1 -SCCMServer AtlantaSCCM -SCCMDrive ATL  
           ===========================================================================  
 function Get-RelativePath {
<#
 .SYNOPSIS
  Get the relative path
 
 .DESCRIPTION
  Returns the location of the currently running PowerShell script
 
 .NOTES
  Additional information about the function.
#>
 
 [CmdletBinding()][OutputType([string])]
 param ()
 
 $Path = (split-path $SCRIPT:MyInvocation.MyCommand.Path -parent) + "\"
 Return $Path
}

function Import-SCCMModule {
 <#  
      .SYNOPSIS  
           Import SCCM Module  
        
      .DESCRIPTION  
           Locate the ConfigurationManager.psd1 file and import it.  
        
      .PARAMETER SCCMServer  
           Name of the SCCM server to connect to.  
        
      .NOTES  
           Additional information about the function.  
 #> 
 
 [CmdletBinding()]
 param
 (
  [ValidateNotNullOrEmpty()][string]$SCCMServer
 )
 
 #Get the architecture of the specified SCCM server  
 $Architecture = (get-wmiobject win32_operatingsystem -computername $SCCMServer).OSArchitecture
 #Get list of installed applications  
 $Uninstall = Invoke-Command -ComputerName $SCCMServer -ScriptBlock { Get-ChildItem -Path REGISTRY::"HKEY_LOCAL_MACHINE\SOFTWARE\Microsoft\Windows\CurrentVersion\Uninstall" -Force -ErrorAction SilentlyContinue }
 If ($Architecture -eq "64-bit") {
  $Uninstall += Invoke-Command -ComputerName $SCCMServer -ScriptBlock { Get-ChildItem -Path REGISTRY::"HKEY_LOCAL_MACHINE\SOFTWARE\WOW6432Node\Microsoft\Windows\CurrentVersion\Uninstall" -Force -ErrorAction SilentlyContinue }
 }
 #Get the registry key that specifies the location of the SCCM installation drive and directory  
 $RegKey = ($Uninstall | Where-Object { $_ -like "*SMS Primary Site*" }) -replace 'HKEY_LOCAL_MACHINE', 'HKLM:'
 $Reg = Invoke-Command -ComputerName $SCCMServer -ScriptBlock { Get-ItemProperty -Path $args[0] } -ArgumentList $RegKey
 #Parse the directory listing  
 $Directory = (($Reg.UninstallString).Split("\", 4) | Select-Object -Index 0, 1, 2) -join "\"
 #Locate the location of the SCCM module  
 $Module = Invoke-Command -ComputerName $SCCMServer -ScriptBlock { Get-ChildItem -Path $args[0] -Filter "ConfigurationManager.psd1" -Recurse } -ArgumentList $Directory
 #If more than one module is present, use the latest one  
 If ($Module.Length -gt 1) {
  foreach ($Item in $Module) {
   If (($NewModule -eq $null) -or ($Item.CreationTime -gt $NewModule.CreationTime)) {
    $NewModule = $Item
   }
  }
  $Module = $NewModule
 }
 #format the $Module unc path  
 [string]$Module = "\\" + $SCCMServer + "\" + ($Module.Fullname -replace ":", "$")
 #Import the SCCM module  
 Import-Module -Name $Module
}

function Get-SCCMCollectionList {
<#
 .SYNOPSIS
  Retrieve Collection List
 
 .DESCRIPTION
  Query the specifies collection in SCCM for a list of all systems residing in that collection.
 
 .PARAMETER CollectionName
  Name of SCCM collection to query
 
 .EXAMPLE
  PS C:\> Get-SCCMCollectionList
 
 .NOTES
  Additional information about the function.
#>
 
 [CmdletBinding()]
 param
 (
  [ValidateNotNullOrEmpty()][string]$CollectionName
 )
 
 #FQDN of SCCM Server
 $FQDN = ([System.Net.Dns]::GetHostByName($SCCMServer)).HostName
 #Create new SCCM drive
 New-PSDrive -Name $SCCMDrive -PSProvider "AdminUI.PS.Provider\CMSite" -Root $FQDN -Description $SCCMDrive"Primary Site" | Out-Null
 #Add colon at end of SCCMDrive if it does not exist
 If ($SCCMDrive[$SCCMDrive.Length - 1] -ne ":") {
  $SCCMDrive = $SCCMDrive + ":"
 }
 #Change to SCCM drive
 Set-Location $SCCMDrive
 #Get the collection ID for retrieving the list of systems
 $CollectionID = (Get-CMDeviceCollection | Where-Object { $_.Name -eq $SCCMCollection }).CollectionID
 #Get list of systems from the specified collection
 $CollectionSystems = (Get-CMDevice -CollectionId $CollectionID).Name | Where-Object { $_ -notlike "*Unknown Computer*" } | Sort-Object
 #Change location to the local drive
 Set-Location $env:HOMEDRIVE
 #Create Collection array
 $Collection = @()
 foreach ($System in $CollectionSystems) {
  try {
   $ADSystem = (Get-ADComputer $System).Enabled
  } catch {
   $ADSystem = $false
  }
  $objSystem = New-Object System.Object
  $objSystem | Add-Member -MemberType NoteProperty -Name Name -Value $System
  $objSystem | Add-Member -MemberType NoteProperty -Name Enabled -Value $ADSystem
  $Collection += $objSystem
}
 Return $Collection
}

function Remove-Systems {
<#
 .SYNOPSIS
  Remove Disabled Systems
 
 .DESCRIPTION
  Remove disabled active directory systems from SCCM
 
 .PARAMETER Collection
  List of all machines in the $SCCMCollection
 
 .EXAMPLE
  PS C:\> Remove-Systems
 
 .NOTES
  Additional information about the function.
#>
 
 [CmdletBinding()]
 param
 (
  [ValidateNotNullOrEmpty()]$Collection
 )
 
 #Add colon at end of SCCMDrive if it does not exist
 If ($SCCMDrive[$SCCMDrive.Length - 1] -ne ":") {
  $SCCMDrive = $SCCMDrive + ":"
 }
 #Change to SCCM drive
 Set-Location $SCCMDrive
 #Parse through list and delete systems from SCCM
 foreach ($System in $Collection) {
  If ($System.Enabled -eq $False) {
   Remove-CMDevice -Name $System.Name -Force
  }
 }
 #Change location to the local drive
 Set-Location $env:HOMEDRIVE
}

Clear-Host
Import-Module ActiveDirectory
Import-SCCMModule -SCCMServer $SCCMServer
$Collection = Get-SCCMCollectionList -CollectionName "All Systems"
If (!($ReportOnly.IsPresent)) {
 Remove-Systems -Collection $Collection
 $Collection
 $Collection | Out-File -FilePath $File -Encoding UTF8 -NoClobber -force
} else {
 #Get execution path of this script
 $RelativePath = Get-RelativePath
 #Location and name of .CSV to write the output to
 $File = $RelativePath + "DisabledSystems.csv"
 #Delete file if it exists
 If ((Test-Path $File) -eq $true) {
  Remove-Item -Path $File -Force
 }
 $Collection
 $Collection | Out-File -FilePath $File -Encoding UTF8 -NoClobber -force
}

26 July 2017

Dell BIOS Reporting Tool

Recently, we ran into a problem when we discovered some of the newer laptops were not automatically disabling the WiFi when connected to ethernet. What made the task even more difficult was that all of our Dell Latitude 7480 systems were already deployed. Being in the legal industry, it is more difficult to ask for time to troubleshoot problems when attorneys bill by the hour.

We knew there was either a new BIOS setting for the 7480 or it had been taken away. To get a list of all the BIOS settings for the 7480, I wrote the script below that uses the Dell Command | Configure to get the BIOS options, settings, and descriptions. You can use the Dell Command | Configure GUI application, but that also requires getting time on the remote machine. This script will grab the info in the background without any interruption to the user.

The script first gets a list of all the available BIOS settings and filters out the following items since I did not see the need for these in the reports:


  • help
  • version
  • infile
  • logfile
  • outfile
  • ovrwrt
  • setuppwd
  • sysdefaults
  • syspwd
The next thing it does it to grab the set value for each setting and then it retrieves the description of the setting. The script formats this data into a table that is exported to a .CSV file for easy viewing. In future models, there will likely be new data, so the script will likely need to be updated. There may also be some data the script did not have access to as the firm I work at only has 8 models of Dell systems. 

The first thing you need to do is to get a list of all systems with their BIOS version. You will want to run this in SCCM in order to find the systems with the latest BIOS version to generate the report on. Here is the WQL code for performing a query in SCCM. 

 select SMS_G_System_COMPUTER_SYSTEM.Manufacturer, SMS_G_System_COMPUTER_SYSTEM.Model, SMS_G_System_PC_BIOS.SMBIOSBIOSVersion, SMS_R_System.Name from SMS_R_System inner join SMS_G_System_PC_BIOS on SMS_G_System_PC_BIOS.ResourceID = SMS_R_System.ResourceId inner join SMS_G_System_COMPUTER_SYSTEM on SMS_G_System_COMPUTER_SYSTEM.ResourceId = SMS_R_System.ResourceId order by SMS_G_System_COMPUTER_SYSTEM.Manufacturer, SMS_G_System_PC_BIOS.SMBIOSBIOSVersion, SMS_G_System_COMPUTER_SYSTEM.Model  

Once you get a list of the systems and choose which one to execute the script on, you have some options. You could either deploy the script through SCCM or you could execute it remotely using PSEXEC. Personally, I used PSEXEC. The only parameter you will need to define is the FilePath, which is the location where the .CSV will be written to.

Here is an example of a .CSV file I ran on my own machine. Some values are left blank because the output exceeded a reasonable amount for this spreadsheet, such as hddinfo. Some are also blank due to security, such as hddpwd.


You can download the script from my GitHub repository located here.


 <#  
      .SYNOPSIS  
           BIOS Reporting Tool  
        
      .DESCRIPTION  
           This script will query the BIOS of Dell machines using the Dell Command | Configure to report the data to SCCM via WMI.  
        
      .PARAMETER FilePath  
           UNC path where to write the file output  
        
      .NOTES  
           ===========================================================================  
           Created with:     SAPIEN Technologies, Inc., PowerShell Studio 2017 v5.4.141  
           Created on:       7/18/2017 9:31 AM  
           Created by:       Mick Pletcher  
           Filename:         DellBIOSReportingTool.ps1  
           ===========================================================================  
 #>  
 [CmdletBinding()]  
 param  
 (  
      [ValidateNotNullOrEmpty()][string]$FilePath  
 )  
   
 function Get-Architecture {  
 <#  
      .SYNOPSIS  
           Get-Architecture  
        
      .DESCRIPTION  
           Returns whether the system architecture is 32-bit or 64-bit  
        
      .EXAMPLE  
           Get-Architecture  
        
      .NOTES  
           Additional information about the function.  
 #>  
        
      [CmdletBinding()][OutputType([string])]  
      param ()  
        
      $OSArchitecture = (Get-WmiObject -Class Win32_OperatingSystem | Select-Object OSArchitecture).OSArchitecture  
      Return $OSArchitecture  
      #Returns 32-bit or 64-bit  
 }  
   
 function Get-RelativePath {  
 <#  
      .SYNOPSIS  
           Get the relative path  
        
      .DESCRIPTION  
           Returns the location of the currently running PowerShell script  
        
      .NOTES  
           Additional information about the function.  
 #>  
        
      [CmdletBinding()][OutputType([string])]  
      param ()  
        
      $Path = (split-path $SCRIPT:MyInvocation.MyCommand.Path -parent) + "\"  
      Return $Path  
 }  
   
 function Get-CCTK {  
 <#  
      .SYNOPSIS  
           Find CCTK.EXE  
        
      .DESCRIPTION  
           Find the Dell CCTK.EXE file.  
        
      .EXAMPLE  
                     PS C:\> Get-CCTK  
        
      .NOTES  
           Additional information about the function.  
 #>  
        
      [CmdletBinding()]  
      param ()  
        
      $Architecture = Get-Architecture  
      If ($Architecture -eq "64-bit") {  
           $Directory = ${env:ProgramFiles(x86)} + "\Dell\"  
           $File = Get-ChildItem -Path $Directory -Filter cctk.exe -Recurse | Where-Object { $_.Directory -like "*_64*" }  
      } else {  
           $Directory = $env:ProgramFiles + "\Dell\"  
           $File = Get-ChildItem -Path $Directory -Filter cctk.exe -Recurse | Where-Object { $_.Directory -like "*x86" }  
      }  
      Return $File  
 }  
   
 function Get-ListOfBIOSSettings {  
 <#  
      .SYNOPSIS  
           Retrieve List of BIOS Settings  
        
      .DESCRIPTION  
           This will get a list of all BIOS settings  
        
      .PARAMETER Executable  
           CCTK.exe  
        
      .EXAMPLE  
           PS C:\> Get-ListOfBIOSSettings  
        
      .NOTES  
           Additional information about the function.  
 #>  
        
      [CmdletBinding()]  
      param  
      (  
           [ValidateNotNullOrEmpty()]$Executable  
      )  
        
      #Get the path this script is executing from  
      $RelativePath = Get-RelativePath  
      #Get list of exclusions to omit from list of BIOS settings  
      $File = $RelativePath + "BIOSExclusions.txt"  
      $BIOSExclusions = Get-Content -Path $File | Sort-Object  
      #Rewrite list of sorted exclusion back to text file  
      $BIOSExclusions | Out-File -FilePath $File -Force  
      #Get list of BIOS settings -- Script must be executed on a local machine and not from a UNC path  
      $Output = cmd.exe /c $Executable.FullName  
      #Remove instructional information  
      $Output = $Output | Where-Object { $_ -like "*--*" } | Where-Object { $_ -notlike "*cctk*" }  
      #Format Data and sort it  
      $Output = ($Output.split("--") | Where-Object { $_ -notlike "*or*" } | Where-Object{ $_.trim() -ne "" }).Trim() | Where-Object { $_ -notlike "*help*" } | Where-Object { $_ -notlike "*version*" } | Where-Object { $_ -notlike "*infile*" } | Where-Object { $_ -notlike "*logfile*" } | Where-Object { $_ -notlike "*outfile*" } | Where-Object { $_ -notlike "*ovrwrt*" } | Where-Object { $_ -notlike "*setuppwd*" } | Where-Object { $_ -notlike "*sysdefaults*" } | Where-Object { $_ -notlike "*syspwd*" } | ForEach-Object { $_.Split("*")[0] } | Where-Object { $_ -notin $BIOSExclusions }  
      #Add bootorder back in as -- filtered it out since it does not have the -- in front of it  
      $Output = $Output + "bootorder" | Sort-Object  
      Return $Output  
 }  
   
 function Get-BIOSSettings {  
 <#  
      .SYNOPSIS  
           Retrieve BIOS Settings Values  
        
      .DESCRIPTION  
           This will retrieve the value associated with the BIOS Settings  
        
      .PARAMETER Settings  
           List of BIOS Settings  
        
      .PARAMETER Executable  
           CCTK.exe file  
        
      .EXAMPLE  
           PS C:\> Get-BIOSSettings  
        
      .NOTES  
           Additional information about the function.  
 #>  
        
      [CmdletBinding()]  
      param  
      (  
           [ValidateNotNullOrEmpty()]$Settings,  
           [ValidateNotNullOrEmpty()]$Executable  
      )  
        
      #Create Array  
      $BIOSArray = @()  
      foreach ($Setting in $Settings) {  
           switch ($Setting) {  
                "advbatterychargecfg" {  
                     $Arguments = [char]34 + $Executable.FullName + [char]34 + [char]32 + "--" + $Setting  
                     $Value = (cmd.exe /c $Arguments).split("=")[1]  
                     $Arguments = [char]34 + $Executable.FullName + [char]34 + [char]32 + "-h" + [char]32 + "--" + $Setting  
                     $Description = (cmd.exe /c $Arguments | Where-Object { $_.trim() -ne "" }).split(":")[1].Trim()  
                }  
                "advsm" {  
                     $Value = ""  
                     $Arguments = [char]34 + $Executable.FullName + [char]34 + [char]32 + "-h" + [char]32 + $Setting  
                     $Description = ((cmd.exe /c $Arguments) | where-object {$_.trim() -ne ""}).split(":")[1].Trim().split(".")[0]  
                }  
                "bootorder" {  
                     $Arguments = [char]34 + $Executable.FullName + [char]34 + [char]32 + $Setting  
                     $Output = (((((cmd.exe /c $Arguments | Where-Object { $_ -like "*Enabled*" } | Where-Object { $_ -notlike "*example*" }) -replace 'Enabled', '').Trim()) -replace '^\d+', '').Trim()) | ForEach-Object { ($_ -split ' {2,}')[1] }  
                     $Output2 = "bootorder="  
                     foreach ($item in $Output) {  
                          [string]$Output2 += [string]$item + ","  
                     }  
                     $Value = $Output2.Substring(0,$Output2.Length-1)  
                     $Arguments = [char]34 + $Executable.FullName + [char]34 + [char]32 + "-h" + [char]32 + $Setting  
                     $Description = ((cmd.exe /c $Arguments) | where-object { $_.trim() -ne "" }).split(":")[1].Trim().split(".")[0]  
                }  
                "hddinfo" {  
                     $Value = ""  
                     $Arguments = [char]34 + $Executable.FullName + [char]34 + [char]32 + "-h" + [char]32 + $Setting  
                     $Description = ((cmd.exe /c $Arguments) | where-object {$_.trim() -ne ""}).split(":")[1].trim().split(".")[0]  
                }  
                "hddpwd" {  
                     $Value = ""  
                     $Arguments = [char]34 + $Executable.FullName + [char]34 + [char]32 + "-h" + [char]32 + $Setting  
                     $Description = ((cmd.exe /c $Arguments) | Where-Object {$_.trim() -ne ""}).split(":")[1].split(".")[0].trim()  
                }  
                "pci" {  
                     $Value = ""  
                     $Arguments = [char]34 + $Executable.FullName + [char]34 + [char]32 + "-h" + [char]32 + $Setting  
                     $Description = ((cmd.exe /c $Arguments) | Where-Object { $_.trim() -ne "" }).split(":")[1].split(".")[0].trim()  
                }  
                "propowntag" {  
                     $Arguments = [char]34 + $Executable.FullName + [char]34 + [char]32 + "--" + $Setting  
                     $Value = ((cmd.exe /c $Arguments).split("=")[1]).trim()  
                     $Arguments = [char]34 + $Executable.FullName + [char]34 + [char]32 + "-h" + [char]32 + $Setting  
                     $Description = ((cmd.exe /c $Arguments) | Where-Object { $_.trim() -ne "" }).split(":")[1].trim()  
                }  
                "secureboot" {  
                     $Arguments = [char]34 + $Executable.FullName + [char]34 + " --" + $Setting  
                     $Output = cmd.exe /c $Arguments  
                     if ($Output -like "*not enabled*") {  
                          $Value = "disabled"  
                     } else {  
                          $Value = "enabled"  
                     }  
                     $Arguments = [char]34 + $Executable.FullName + [char]34 + [char]32 + "-h" + [char]32 + $Setting  
                     $Description = ((cmd.exe /c $Arguments) | where-object { $_.trim() -ne "" }).split(":")[1].Trim().split(".")[0]  
                }  
                default {  
                     #Get BIOS setting  
                     $Output = $null  
                     $Arguments = [char]34 + $Executable.FullName + [char]34 + [char]32 + "--" + $Setting  
                     $Output = cmd.exe /c $Arguments  
                     #Get BIOS Description  
                     $Arguments = [char]34 + $Executable.FullName + [char]34 + [char]32 + "-h" + [char]32 + "--" + $Setting  
                     $Description = ((cmd.exe /c $Arguments) | Where-Object { $_.trim() -ne "" }).split(":").Trim()[1]  
                     $Value = $Output.split("=")[1]  
                }  
           }  
           #Add Items to object array  
           $objBIOS = New-Object System.Object  
           $objBIOS | Add-Member -MemberType NoteProperty -Name Setting -Value $Setting  
           $objBIOS | Add-Member -MemberType NoteProperty -Name Value -Value $Value  
           $objBIOS | Add-Member -MemberType NoteProperty -Name Description -Value $Description  
           $BIOSArray += $objBIOS  
      }  
      Return $BIOSArray  
 }  
 #Find the CCTK.exe file  
 $CCTK = Get-CCTK  
 #Get List of BIOS settings  
 $BIOSList = Get-ListOfBIOSSettings -Executable $CCTK  
 #Get all BIOS settings  
 $BIOSSettings = Get-BIOSSettings -Executable $CCTK -Settings $BIOSList  
 #Add Computer Model to FileName  
 $FileName = ((Get-WmiObject -Class win32_computersystem -Namespace root\cimv2).Model).Trim()  
 #Add BIOS version and .CSV extension to computer name  
 $FileName += [char]32 + ((Get-WmiObject -Class win32_bios -Namespace root\cimv2).SMBIOSBIOSVersion).Trim() + ".CSV"  
 #Get full path to the output .CSV file  
 If ($FilePath[$FilePath.Length - 1] -ne "\") {  
      $FileName = $FilePath + "\" + $FileName  
 } else {  
      $FileName = $FilePath + $FileName  
 }  
 #Delete old .CSV if it exists  
 If ((Test-Path $FileName) -eq $true) {  
      Remove-Item -Path $FileName -Force  
 }  
 #Screen output  
 $BIOSSettings  
 #File output  
 $BIOSSettings | Export-Csv -Path $FileName -NoTypeInformation -Force  
   

17 July 2017

TPM Readiness Verification

A while back, I posted a PowerShell script that verified if the TPM was ready for BitLocker to be applied in a build. Recently, the script stopped working. I decided to decipher the code I had borrowed to make the script work. In looking at it, I found a way to significantly simplify the code down to one-liners.

The objective is to verify the TPM is ready for BitLocker encryption before an image is laid down. This is so that if the technician forgets to ready the TPM, it won't go through the entire build process and then fail near the end, thereby wasting a lot of time. There are five steps to verifying this. They are:

NOTE: As stated in this Dell article, Windows 10 takes ownership of the TPM once the OS is laid down and booted up. It will retake ownership everytime the OS starts unless otherwise stopped by the Disable-TPMAutoProvisioning cmdlet. This means that if you use the Verify No TPM Ownership script after the OS is laid down, it will fail.
  • Verify TPM Ownership is Allowed
  • Verify TPM is Enabled
  • Verify No TPM Ownership
  • Verify TPM is Activated
  • Set the BIOS Password
Each of these steps can be accomplished as a one-liner using PowerShell. As a one-liner, they can be implemented as individual task sequences as shown below.


Each task is set up as a Run Command Line. When WinPE loads, it gathers data in the WMI of the TPM status. I started out using the Get-WMIObject which returned a boolean value. The problem was that MDT does not recognize boolean values. It had to be converted to an integer. The second problem was that executing this via PowerShell would not return the boolean value. It only returned if the expression was successfully executed. That is what the if then else does with the exit 1 or 0. Here are the command lines used along with the required success code.

  • Verify TPM Ownership is Allowed
    • powershell.exe -executionpolicy bypass -command "&{Write-Host 'TPM OwnerShip: ' -NoNewLine;if (([int]((Get-WmiObject -Namespace ROOT\CIMV2\Security\MicrosoftTpm -Class Win32_Tpm).IsOwnerShipAllowed().IsOwnerShipAllowed)) -eq 1) {Write-Host 'Allowed' -ForegroundColor Yellow;Exit 0 } else {Write-Host 'Not Allowed' -ForegroungColor Red;Exit 1}}"
    • Success Code: 1
    • Success Exit Code: 0
  • Verify TPM is Enabled
    • powershell.exe -executionpolicy bypass -command "&{Write-Host 'TPM Enabled: ' -NoNewLine;if (([int]((Get-WmiObject -Namespace ROOT\CIMV2\Security\MicrosoftTpm -Class Win32_Tpm).IsEnabled().isenabled)) -eq 1) {Write-Host 'Yes' -ForegroundColor Yellow;Exit 0 } else {Write-Host 'No' -ForegroundColor Red;Exit 1}}"
    • Success Code: 1
    • Success Exit Code: 0
  • Verify No TPM Ownership
    • powershell.exe -executionpolicy bypass -command "&{Write-Host 'TPM Owned: ' -NoNewLine;if (([int]((Get-WmiObject -Namespace ROOT\CIMV2\Security\MicrosoftTpm -Class Win32_Tpm).isowned().isowned)) -eq 1) {Write-Host 'No' -ForegroundColor Yellow;Exit 0 } else {Write-Host 'No' -ForegroundColor Red;Exit 1}}"
    • Success Code: 1
    • Success Exit Code: 0
  • Verify TPM is Activated
    • powershell.exe -executionpolicy bypass -command "&{Write-Host 'TPM Activated: ' -NoNewLine;if (([int]((Get-WmiObject -Namespace ROOT\CIMV2\Security\MicrosoftTpm -Class Win32_Tpm).IsActivated().isactivated)) -eq 1) {Write-Host 'Yes' -ForegroundColor Yellow;Exit 0 } else {Write-Host 'No' -ForegroundColor Red;Exit 1}}"
    • Success Code: 1
    • Success Exit Code: 0
The other part to this is setting the BIOS password, which also requires CCTK to be installed. For more information on installing the CCTK within the WinPE environment, please refer to this blog entry.

The task sequence to set the BIOS password is shown below. This occurs after the installation of CCTK is done. The task sequence needs to be setup as a Run Command Line. The command line for it is as follows:


  • Set BIOS Password
    • powershell.exe -command "&{If (((Start-Process -FilePath x:\CCTK\cctk.exe -ArgumentList '--setuppwd=<BIOS Password>' -wait -passthru).ExitCode) -eq 115) {(Start-Process -FilePath x:\CCTK\cctk.exe -ArgumentList '--valsetuppwd=<BIOS Password> --setuppwd=<BIOS Password>' -wait -passthru).ExitCode}}"
This command line first tries to set the BIOS password if it is not set. If it is, an error code of 115 is returned and the command line entering the BIOS password is then executed. 

This is all that is required to execute this. Here is a video of the task sequences executing in the build process. 

Here is a video of the task sequences executing at the beginning of the build. 


There is also an alternative to failing at the beginning of the build process. You could have the one-liner create a task sequence variable that would be a flag for a later task just before the BitLocker process starts that would pause the build by initiating the LTISuspend.wsf and pop-up an alert saying to ready the TPM before unpausing the build. We decided to stop the build initially because that reminds the technician that they needed to ready the TPM first. 

MDT: Executing an application multiple times in a task sequence

Recently, I published a new script that updates all of the Dell drivers on a system automatically. I wanted the script to execute twice in the task sequence with a reboot in between executions. This is so if some drivers or apps do not install the first try due to conflicts with another installation, they will install on the second try.

The first thing I tried was entering the execution as an application and putting the App install in the task sequence twice. During the build, the application would only install once. The second time it skipped over it. To accomplish this, I ended up using a Run Command Line to execute the application more than once and it worked. So if you need to execute an application more than once, use the Run Command Line to do so. 

12 July 2017

Pending Reboot Reporting

Recently, I implemented Kent Agerlund's technique for monitoring pending reboots located here. This works great, but I also found out there are additional reboot flags on systems that I wanted to monitor. I must say a big thank you to Dean Attali's blog How to Check if a Server Needs a Reboot for providing the information on which registry keys and WMI entries indicate a system is waiting for a reboot. After getting that information, I changed step 5 from Kent's blog with the script below.

The new PowerShell code checks if the system is waiting for a reboot due to windows updates, changes to OS components, pending file rename operations, and if Configuration Manager reboot is pending. All of these are registry queries, except for the Configuration Manager, which is a WMI query.

If you do not want the pending file rename operation, you can comment that line out with a # ($PendingFileRenameOperations = (Get-ItemProperty -Path REGISTRY::"HKEY_LOCAL_MACHINE\SYSTEM\CurrentControlSet\Control\Session Manager" -ErrorAction SilentlyContinue).PendingFileRenameOperations)

To test this, I implemented the new code in the configuration item in SCCM yesterday, already knowing one of the servers needed a reboot. It popped into the collection this morning.


You can download this code from my GitHub site located here.


 <#  
      .SYNOPSIS  
           Reboot Pending Detection  
        
      .DESCRIPTION  
           This script will the four reboot pending flags to verify if a system is pending a reboot. The flags include Windows patches, component based servicing, session manager, and finally configuration manager client.   
        
      .NOTES  
           ===========================================================================  
           Created with:     SAPIEN Technologies, Inc., PowerShell Studio 2017 v5.4.141  
           Created on:       7/11/2017 1:10 PM  
           Created by:       Mick Pletcher  
           Filename:         PendingRebootReporting.ps1  
           ===========================================================================  
 #>  
   
 #Checks if the registry key RebootRequired is present. It is created when Windows Updates are applied and require a reboot to take place  
 $PatchReboot = Get-ChildItem -Path REGISTRY::"HKEY_LOCAL_MACHINE\SOFTWARE\Microsoft\Windows\CurrentVersion\WindowsUpdate\Auto Update\RebootRequired" -ErrorAction SilentlyContinue  
 #Checks if the RebootPending key is present. It is created when changes are made to the component store that require a reboot to take place  
 $ComponentBasedReboot = Get-ChildItem -Path REGISTRY::"HKEY_LOCAL_MACHINE\SOFTWARE\Microsoft\Windows\CurrentVersion\Component Based Servicing\RebootPending" -ErrorAction SilentlyContinue  
 #Checks if File rename operations are taking place and require a reboot for the operation to take effect  
 $PendingFileRenameOperations = (Get-ItemProperty -Path REGISTRY::"HKEY_LOCAL_MACHINE\SYSTEM\CurrentControlSet\Control\Session Manager" -ErrorAction SilentlyContinue).PendingFileRenameOperations  
 #Performs a WMI query of the configuration manager service to check if a reboot is pending  
 $ConfigurationManagerReboot = Invoke-WmiMethod -Namespace "ROOT\ccm\ClientSDK" -Class CCM_ClientUtilities -Name DetermineIfRebootPending | select-object -ExpandProperty "RebootPending"  
 If (($PatchReboot -eq $null) -and ($ComponentBasedReboot -eq $null) -and ($PendingFileRenameOperations -eq $null) -and ($ConfigurationManagerReboot -eq $false)) {  
      Return $false  
 } else {  
      Return $true  
 }  
   

07 July 2017

Dell Automatic BIOS, Application, and Driver Updates in Build

Recently, the Install Dell Command Update and Flash BIOS in WinPE solution I published stopped working when we purchased the Dell E7280. The Dell Command | Update was installing a driver in the WinPE environment that would stick in a continuous installation. Before, it was an all or nothing thing on using the DCU-CLI.exe within WinPE. It could not accept any parameters. I finally figured that problem out. I injected MSI.dll into the %WINDIR%\system32 folder and full functionality of the executable was enabled.

I decided to rework the entire script at that point. The script now operates in both WinPE and the Windows environment. You may ask why you would want to execute this in WinPE. The reason is that if there is a BIOS update needed and you also configure BIOS settings before the OS is laid down, you will want this to be performed first as some BIOS settings cannot be changed after the OS is laid down.

The script detects if it is running in WinPE and will only execute a BIOS update at that point. The way the script works is that it executes the DCU-CLI.exe and uses the /report parameter to only generate a report on what to install. Here is a sample report:


The script then reads the XML report file as shown above to find what to install. In WinPE, it automatically knows to only run the BIOS update. In Windows, it will install all updates if no parameter is defined. You can see in the script that I have defined BIOS, Drivers, and Applications meaning if you select any of these, that is all that will be installed. If you don't select any, all will be installed.

Inside the XML file, there is the <file> field that gives the download address for downloading the driver. After talking with Warren Byle from Dell, I verified that types of updates to include in this script. Warren also verified the release code is unique for every new version of a driver. This gave me the idea to create a local driver repository so they can be downloaded and then executed locally. This saves a lot on time and bandwidth, especially when talking about hundreds of megabytes of data downloads.

The script downloads every driver listed in the XML file to the specified network share outlined in the WindowsRepository parameter. It will first scan the repository folders for one named after the release code and verify the contents matches the file download. If so, it skips downloading.

The next step is installing the drivers. I found that /S works on all Dell driver installations. The only part I had to figure out were the return codes, which are 0, 2, and 3010 for a successful installation.

Another thing I changed was the process of setting this up in MDT. Here are the steps I put in the task sequence processes for running this within WinPE.


I chose to use T: for my mapped drive since I know that driver letter is not used for anything else here. The Map T: Drive task is as shown.


The next step was copying the Dell Client | Update files to WinPE.


These files I copy over were grabbed from the Dell Command | Update directory after it had been installed on a PC.


The next thing I do is to copy the MSI.DLL file to the WinPE system32 directory. I grabbed this file initially from the system32 directory on my Win10 machine.


The next step is unmapping the T: drive. This is necessary because we are going to map that drive letter to the next UNC path.


The next step is to map to the repository location, where the PowerShell script also resides.


We're now going to copy over the PowerShell script. You may wonder why I chose here. That is because this script is intended to be executed both in WinPE and Windows. This directory will be used in Windows, so why not keep the script in the same place instead of having to make a copy of it?


The next step is executing the script. Here is the command line I use: powershell.exe -executionpolicy bypass -file %SystemDrive%\DCU\DellBIOSDriverUpdate.ps1 -WindowsRepository \\<FileShare Repository> -BIOSPassword <Password> -WinPERepository "t:"


The next step is deleting the old XML file. I have the task sequences copy over the XML file to the repository directory in the event I want to look at it. This task sequence deletes the file if it exists.


The next step is to copy the XML to the repository.


Finally, we unmap the T: drive again.


This is all that is to use this script in the WinPE environment.

Next, is using it in the windows environment. This one is much easier. The first thing, don't enter it as an application. If you do, it can only be executed one time in the task sequence. Enter it as a Run Command line task sequence as shown below.


You do need to use the full UNC path and filename for the command line and enter the UNC path under start in.


You maybe wondering what the repository looks like. Here is a pic of the repository that contains the directories labeled after each release version containing the update. The XML files contain the report of all needed drivers derived from the dcu-cli.exe. This is also where I keep this script.


This is a video showing the process of the script in action. I exposed the steps to display on the screen so you could see what it is doing here.


Here is a video of it operating during the build after the OS was laid down.


You can download this script from my GitHub site located here.


 <#  
      .SYNOPSIS  
           Update the BIOS and Drivers  
        
      .DESCRIPTION  
           This script will update the BIOS, Applications, and Drivers. It can detect if it is running within the WinPE or Windows environments. If it is running within WinPE, it will only update the BIOS, otherwise it will run all updates.  
        
      .PARAMETER WindowsRepository  
           UNC path to the updates Windows Repository that is accessible if the operating system is present  
        
      .PARAMETER BIOSPassword  
           Password for the BIOS  
        
      .PARAMETER BIOS  
           Perform BIOS updates only  
        
      .PARAMETER Drivers  
           Perform drivers updates only  
        
      .PARAMETER Applications  
           Perform applications updates only  
        
      .PARAMETER WinPERepository  
           Path to the updates Windows Repository that is accessible if running within WinPE  
        
      .EXAMPLE  
           Running in Windows only and applying all updates  
                powershell.exe -file DellBIOSDriverUpdate.ps1 -WindowsRepository "\\UNCPath2Repository"  
   
           Running in WinPE Only  
                powershell.exe -file DellBIOSDriverUpdate.ps1 -WinPERepository "t:"  
   
           Running in both Windows and WinPE  
                powershell.exe -file DellBIOSDriverUpdate.ps1 -WindowsRepository "\\UNCPath2Repository" -WinPERepository "t:"  
   
      .NOTES  
           ===========================================================================  
           Created with:    SAPIEN Technologies, Inc., PowerShell Studio 2017 v5.4.140  
           Created on:      6/21/2017 3:16 PM  
           Created by:      Mick Pletcher  
           Filename:        DellBIOSDriverUpdate.ps1  
           ===========================================================================  
 #>  
   
 param  
 (  
      [string]$WindowsRepository,  
      [string]$BIOSPassword,  
      [switch]$BIOS,  
      [switch]$Drivers,  
      [switch]$Applications,  
      [string]$WinPERepository  
 )  
   
 function Get-Architecture {  
 <#  
      .SYNOPSIS  
           Get-Architecture  
        
      .DESCRIPTION  
           Returns 32-bit or 64-bit  
        
      .EXAMPLE  
           Get-Architecture  
        
      .NOTES  
           Additional information about the function.  
 #>  
        
      [CmdletBinding()][OutputType([string])]  
      param ()  
        
      $OSArchitecture = (Get-WmiObject -Class Win32_OperatingSystem | Select-Object OSArchitecture).OSArchitecture  
      Return $OSArchitecture  
 }  
   
 function Get-WindowsUpdateReport {  
 <#  
      .SYNOPSIS  
           Get list of updates to install  
        
      .DESCRIPTION  
           Execute the dcu-cli.exe to get a list of updates to install.  
        
      .EXAMPLE  
           PS C:\> Get-WindowsUpdateReport  
        
      .NOTES  
           Additional information about the function.  
 #>  
        
      [CmdletBinding()][OutputType([xml])]  
      param ()  
        
      #Test if this is running in the WinPE environment  
      If ((test-path -Path 'REGISTRY::HKEY_LOCAL_MACHINE\SOFTWARE\Microsoft\Windows NT\CurrentVersion\WinPE\') -eq $true) {  
           $Executable = Get-ChildItem -Path "x:\DCU" -Filter dcu-cli.exe  
           $ReportFile = "x:\DCU\DriverReport.xml"  
      } else {  
           $Architecture = Get-Architecture  
           If ($Architecture -eq "32-Bit") {  
                $Executable = Get-ChildItem -Path $env:ProgramFiles"\Dell\CommandUpdate" -Filter dcu-cli.exe  
           } else {  
                $Executable = Get-ChildItem -Path ${env:ProgramFiles(x86)}"\Dell\CommandUpdate" -Filter dcu-cli.exe  
           }  
           #Name and location of the report file  
           If ($WindowsRepository[$WindowsRepository.Length - 1] -ne "\") {  
                $ReportFile = $WindowsRepository + "\" + "DriverReport.xml"  
           } else {  
                $ReportFile = $WindowsRepository + "DriverReport.xml"  
           }  
      }  
      #Delete XML report file if it exists  
      If ((Test-Path -Path $ReportFile) -eq $true) {  
           Remove-Item -Path $ReportFile -Force -ErrorAction SilentlyContinue  
      }  
      #Define location where to write the report  
      $Switches = "/report" + [char]32 + $ReportFile  
      #Get dcu-cli.exe report  
      $ErrCode = (Start-Process -FilePath $Executable.FullName -ArgumentList $Switches -Wait -Passthru).ExitCode  
      #Retrieve list of drivers if XML file exists  
      If ((Test-Path -Path $ReportFile) -eq $true) {  
           #Get the contents of the XML file  
           [xml]$DriverList = Get-Content -Path $ReportFile  
           Return $DriverList  
      } else {  
           Return $null  
      }  
 }  
   
 function Get-WinPEUpdateReport {  
 <#  
      .SYNOPSIS  
           Get Dell Client Update Report  
        
      .DESCRIPTION  
           Execute the Dell Client | Update to generate the XML file listing available updates  
        
      .EXAMPLE  
           PS C:\> Get-WinPEUpdateReport  
        
      .NOTES  
           Additional information about the function.  
 #>  
        
      [CmdletBinding()]  
      param ()  
        
      #Define XML Report File  
      $ReportFile = $env:SystemDrive + "\DCU\DriversReport.xml"  
      #Delete XML Report file  
      If ((Test-Path $ReportFile) -eq $true) {  
           Remove-Item -Path $ReportFile -Force | Out-Null  
      }  
      #Define Dell Client | Update commandline executable  
      $Executable = $env:SystemDrive + "\DCU\dcu-cli.exe"  
      #Define switches for Dell Client | Update  
      $Switches = "/report" + [char]32 + $ReportFile  
      #Execute Dell Client | Update  
      $ErrCode = (Start-Process -FilePath $Executable -ArgumentList $Switches -Wait -Passthru).ExitCode  
      #Retrieve list of drivers if XML file exists  
      If ((Test-Path -Path $ReportFile) -eq $true) {  
           #Get the contents of the XML file  
           [xml]$DriverList = Get-Content -Path $ReportFile  
           Return $DriverList  
      } else {  
           Return $null  
      }  
 }  
   
 function Update-Repository {  
 <#  
      .SYNOPSIS  
           Update the repository  
        
      .DESCRIPTION  
           This function reads the list of items to be installed and checks the repository to make sure the item is present. If it is not, the item is downloaded to the repository.  
        
      .PARAMETER Updates  
           List of Updates to be installed  
        
      .EXAMPLE  
           PS C:\> Update-Repository  
        
      .NOTES  
           Additional information about the function.  
 #>  
        
      [CmdletBinding()]  
      param  
      (  
           [ValidateNotNullOrEmpty()]$Updates  
      )  
        
      #Set the variable to the to the repository  
      If ((test-path -Path 'REGISTRY::HKEY_LOCAL_MACHINE\SOFTWARE\Microsoft\Windows NT\CurrentVersion\WinPE\') -eq $true) {  
           If ($WinPERepository[$WinPERepository.Length - 1] -ne "\") {  
                $Repository = $WinPERepository + "\"  
           } else {  
                $Repository = $WinPERepository  
           }  
      } elseif ($WindowsRepository[$WindowsRepository.Length - 1] -ne "\") {  
           $Repository = $WindowsRepository + "\"  
      } else {  
           $Repository = $WindowsRepository  
      }  
      foreach ($Update in $Updates.Updates.Update) {  
           #Define the storage location of this driver  
           $UpdateRepository = $Repository + $Update.Release  
           #Get the URI to download the file from  
           $DownloadURI = $Update.file  
           $DownloadFileName = $UpdateRepository + "\" + ($DownloadURI.split("/")[-1])  
           #Create the new directory if it does not exist  
           If ((Test-Path $UpdateRepository) -eq $false) {  
                New-Item -Path $UpdateRepository -ItemType Directory -Force | Out-Null  
           }  
           #Download file if it does not exist  
           If ((Test-Path $DownloadFileName) -eq $false) {  
                Invoke-WebRequest -Uri $DownloadURI -OutFile $DownloadFileName  
           }  
      }  
 }  
   
 function Update-Applicatons {  
 <#  
      .SYNOPSIS  
           Update Dell Applications  
        
      .DESCRIPTION  
           This function only updates Dell Applications  
        
      .PARAMETER Updates  
           List of updates to install  
        
      .EXAMPLE  
           PS C:\> Update-Applicatons  
        
      .NOTES  
           Additional information about the function.  
 #>  
        
      [CmdletBinding()]  
      param  
      (  
           [ValidateNotNullOrEmpty()]$Updates  
      )  
        
      if ($WindowsRepository[$WindowsRepository.Length - 1] -ne "\") {  
           $Repository = $WindowsRepository + "\"  
      } else {  
           $Repository = $WindowsRepository  
      }  
      foreach ($Update in $Updates.Updates.Update) {  
           #Check if update is a application update  
           If ($Update.type -eq "Application") {  
                #Get application update file  
                $UpdateFile = $Repository + $Update.Release + "\" + (($Update.file).split("/")[-1])  
                #Verify application update file exists  
                If ((Test-Path $UpdateFile) -eq $true) {  
                     $Output = "Installing " + $Update.name + "....."  
                     Write-Host $Output -NoNewline  
                     # /s to suppress user interface  
                     $Switches = "/s"  
                     $ErrCode = (Start-Process -FilePath $UpdateFile -ArgumentList $Switches -WindowStyle Minimized -Wait -Passthru).ExitCode  
                     If (($ErrCode -eq 0) -or ($ErrCode -eq 3010)) {  
                          Write-Host "Success" -ForegroundColor Yellow  
                     } else {  
                          Write-Host "Failed" -ForegroundColor Red  
                     }  
                }  
           }  
      }  
 }  
   
 function Update-BIOS {  
 <#  
      .SYNOPSIS  
           Update the BIOS  
        
      .DESCRIPTION  
           This function will update the BIOS on the system  
        
      .PARAMETER Updates  
           List of updates to install  
        
      .PARAMETER Update  
           XML info of the BIOS update  
        
      .EXAMPLE  
           PS C:\> Update-BIOS  
        
      .NOTES  
           Additional information about the function.  
 #>  
        
      [CmdletBinding()]  
      param  
      (  
           [ValidateNotNullOrEmpty()]$Updates  
      )  
        
      #Set the variable to the to the repository  
      If ((test-path -Path 'REGISTRY::HKEY_LOCAL_MACHINE\SOFTWARE\Microsoft\Windows NT\CurrentVersion\WinPE\') -eq $true) {  
           If ($WinPERepository[$WinPERepository.Length - 1] -ne "\") {  
                $Repository = $WinPERepository + "\"  
           } else {  
                $Repository = $WinPERepository  
           }  
      } elseif ($WindowsRepository[$WindowsRepository.Length - 1] -ne "\") {  
           $Repository = $WindowsRepository + "\"  
      } else {  
           $Repository = $WindowsRepository  
      }  
      foreach ($Update in $Updates.Updates.Update) {  
           #Check if update is a BIOS update  
           If ($Update.type -eq "BIOS") {  
                #Get BIOS update file  
                $UpdateFile = $Repository + $Update.Release + "\" + (($Update.file).split("/")[-1])  
                #Verify BIOS update file exists  
                If ((Test-Path $UpdateFile) -eq $true) {  
                     $Output = "Installing " + $Update.name + "....."  
                     Write-Host $Output -NoNewline  
                     # /s to suppress user interface  
                     $Switches = "/s /p=" + $BIOSPassword  
                     $ErrCode = (Start-Process -FilePath $UpdateFile -ArgumentList $Switches -WindowStyle Minimized -Wait -Passthru).ExitCode  
                     If (($ErrCode -eq 0) -or ($ErrCode -eq 2) -or ($ErrCode -eq 3010)) {  
                          Write-Host "Success" -ForegroundColor Yellow  
                     } else {  
                          Write-Host "Failed" -ForegroundColor Red  
                     }  
                }  
           }  
      }  
 }  
   
 function Update-Drivers {  
 <#  
      .SYNOPSIS  
           Update Dell Drivers  
        
      .DESCRIPTION  
           This function only updates Dell drivers  
        
      .PARAMETER Updates  
           List of updates to install  
        
      .EXAMPLE  
           PS C:\> Update-Drivers  
        
      .NOTES  
           Additional information about the function.  
 #>  
        
      [CmdletBinding()]  
      param  
      (  
           [ValidateNotNullOrEmpty()]$Updates  
      )  
        
      if ($WindowsRepository[$WindowsRepository.Length - 1] -ne "\") {  
           $Repository = $WindowsRepository + "\"  
      } else {  
           $Repository = $WindowsRepository  
      }  
      foreach ($Update in $Updates.Updates.Update) {  
           #Check if update is a application update  
           If ($Update.type -eq "Driver") {  
                #Get driver update file  
                $UpdateFile = $Repository + $Update.Release + "\" + (($Update.file).split("/")[-1])  
                $UpdateFile = Get-ChildItem -Path $UpdateFile  
                #Verify driver update file exists  
                If ((Test-Path $UpdateFile) -eq $true) {  
                     $Output = "Installing " + $Update.name + "....."  
                     Write-Host $Output -NoNewline  
                     # /s to suppress user interface  
                     $Switches = "/s"  
                     $ErrCode = (Start-Process -FilePath $UpdateFile.Fullname -ArgumentList $Switches -WindowStyle Minimized -Passthru).ExitCode  
                     $Start = Get-Date  
                     Do {  
                          $Process = (Get-Process | Where-Object { $_.ProcessName -eq $UpdateFile.BaseName }).ProcessName  
                          $Duration = (Get-Date - $Start).TotalMinutes  
                     } While (($Process -eq $UpdateFile.BaseName) -and ($Duration -lt 10))  
                     If (($ErrCode -eq 0) -or ($ErrCode -eq 2) -or ($ErrCode -eq 3010)) {  
                          Write-Host "Success" -ForegroundColor Yellow  
                     } else {  
                          Write-Host "Failed with error code $ErrCode" -ForegroundColor Red  
                     }  
                }  
           }  
      }  
 }  
   
   
 Clear-Host  
 #Check if running in WinPE environment and get Windows Updates Report  
 If ((test-path -Path 'REGISTRY::HKEY_LOCAL_MACHINE\SOFTWARE\Microsoft\Windows NT\CurrentVersion\WinPE\') -eq $true) {  
      $Updates = Get-WinPEUpdateReport  
 } Else {  
      #Get list of drivers  
      $Updates = Get-WindowsUpdateReport  
 }  
 $Updates.Updates.Update.Name  
 #Process drivers if there is a list  
 If ($Updates -ne $null) {  
      Update-Repository -Updates $Updates  
 }  
 #Check if running in WinPE environment  
 If ((test-path -Path 'REGISTRY::HKEY_LOCAL_MACHINE\SOFTWARE\Microsoft\Windows NT\CurrentVersion\WinPE\') -eq $true) {  
      #Perform BIOS Update  
      Update-BIOS -Updates $Updates  
 } Else {  
      #Install Applications (APP)  
      If (($Applications.IsPresent) -or ((!($Applications.IsPresent)) -and (!($BIOS.IsPresent)) -and (!($Drivers.IsPresent)))) {  
           Update-Applicatons -Updates $Updates  
      }  
      #Install BIOS (BIOS)  
      If (($BIOS.IsPresent) -or ((!($Applications.IsPresent)) -and (!($BIOS.IsPresent)) -and (!($Drivers.IsPresent)))) {  
           Update-BIOS -Updates $Updates  
      }  
      #Install Bundle (SBDL)  
      #Install Drivers (DRVR)  
      If (($Drivers.IsPresent) -or ((!($Applications.IsPresent)) -and (!($BIOS.IsPresent)) -and (!($Drivers.IsPresent)))) {  
           Update-Drivers -Updates $Updates  
      }  
      #Install Firmware (FRMW)  
      #Install ISV Driver (ISVDRVR)  
 }